Getting started with A/B testing can be completely free. In this article, I will describe how to do this using GA4 and GTM. This article is comprehensive, but some parts might have a different user interface (UI). You can access the complete documentation, which expands on this article, for free at abtesting.sandervolbeda.com.
Google Optimize is sunsetting. The exact date depends on when you are reading this article, but the process started in September 2023.
It’s sad that a free and accessible tool like Google Optimize didn’t continue development. Experimentation should be accessible to everyone, and there should be a free tool for running experiments.
Why? Experimentation is not typically something we learn in school. Instead, we learn it by working at other companies or teaching ourselves. However, there should be a way for individuals to conduct experiments for free. Of course, having a website with traffic is necessary.
Indeed, you may have wondered whether it’s possible to conduct experiments with GTM. Well, the answer is yes! And the good news is that it integrates seamlessly with Google Analytics (GA4).
However, before we get started, there are a few things you’ll need to have already in place.
Allow me to briefly explain how it works, so you have a clear understanding of what you’ll be working on. It’s worth noting that this process is asynchronous, which means that it occurs during the website loading phase rather than after it has loaded.
When a visitor lands on your website, Google Tag Manager will trigger the initialisation event, which is the first thing we’ll set up. This event will trigger the initialisation trigger.
When the initialis
ation trigger is fired, the splitter tag will run. The splitter tag will execute JavaScript code that splits our traffic and saves the version of the experiment in the visitor’s localStorage.
The GA4 configuration tag will be triggered by the page view trigger, which will send our data to GA4 with a version variable.
The container-loaded event can also trigger two tags, depending on the stored version.
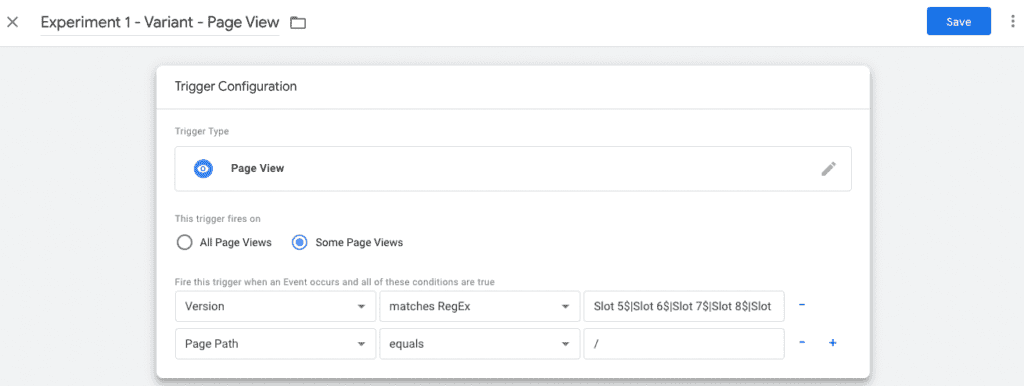
If the version includes slots 5, 6, 7, 8, or 9, the variant trigger will be fired, which will execute the variant tag that contains the experiment code.
If the version includes slots 0, 1, 2, 3, or 4, the control trigger will be fired, which will execute the control tag.
Each slot represents 10% of the traffic, and the number of slots is used to randomly split the traffic and facilitate Multi-Variant Testing.
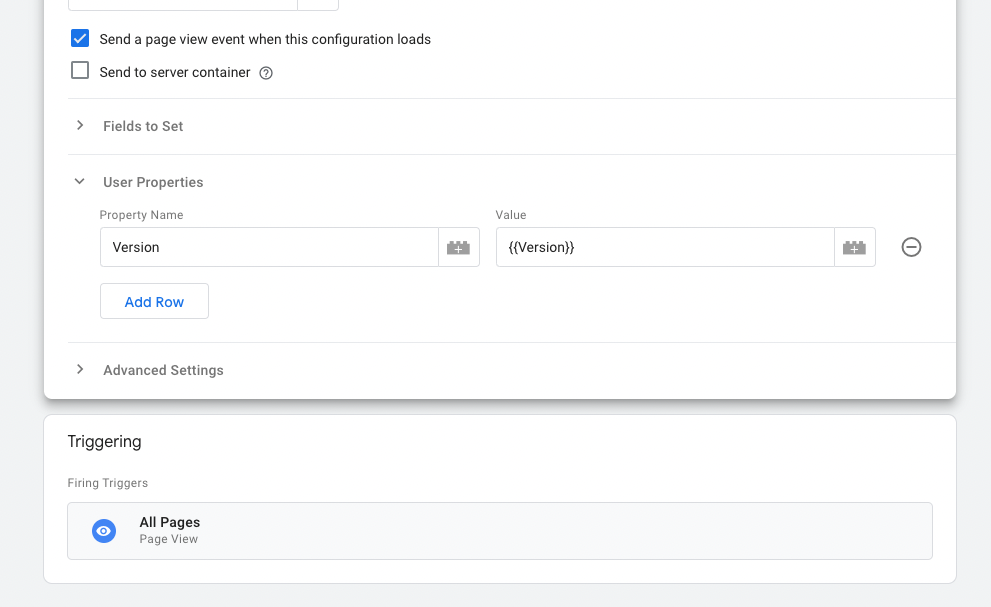
Let’s start with creating a custom definition in Google Analytics 4. This will be your connection between GTM and GA4.
That’s it for now in GA4!

The downside of GA4 is that it takes time before the data appears. It can take up to 48 hours before data is showing in GA4, after creating the custom definition.
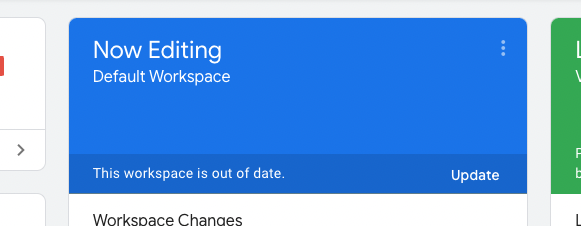
A valuable lesson I acquired through coding is to avoid working directly on the master branch (or the default Workspace in our situation). To start, it is essential to launch GTM (Google Tag Manager). Locate the Default Workspace option in the left sidebar and click on it. Afterwards, locate the “+” icon positioned in the upper right corner and give it a click.
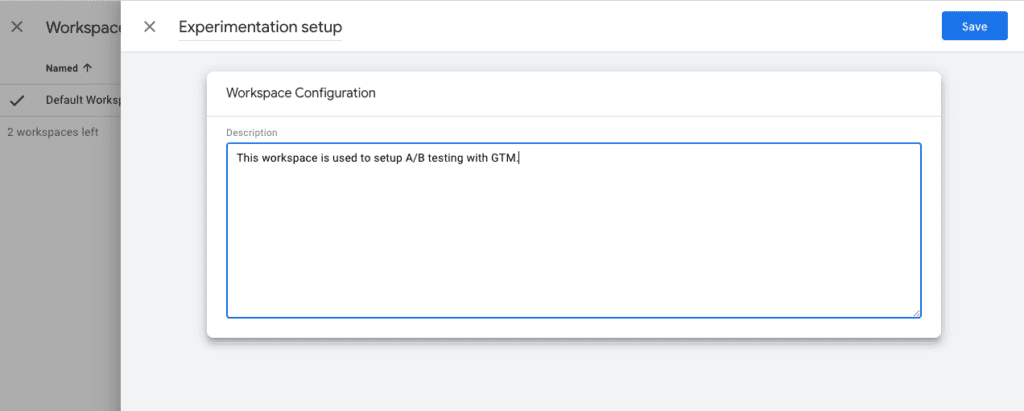
Name: Experimentation setup
Description: Setting up everything to start with experimentation. This is based on the article of Sander Volbeda.
Save.
This will make sure nobody is working on the same version as we are. It’s just a security measure.
Let’s get going!
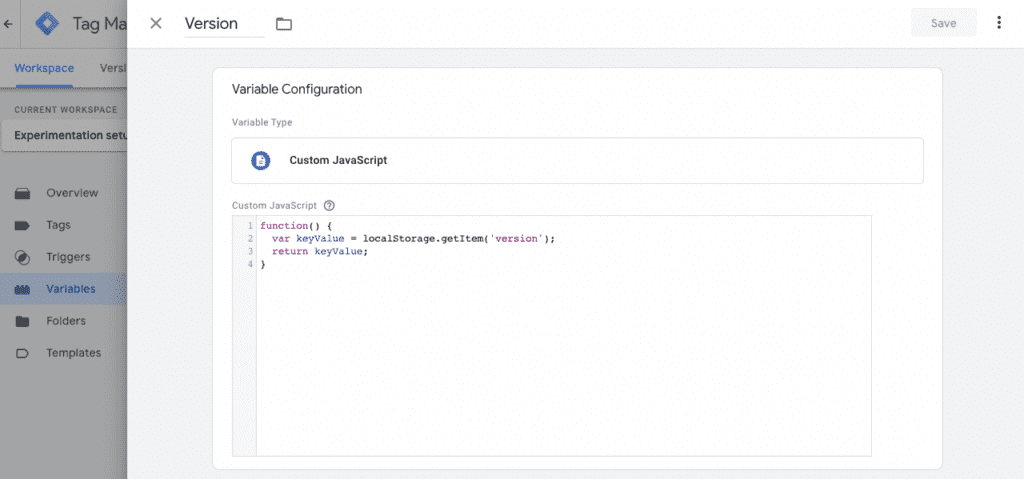
The first thing we’ll do is to create a new variable. This piece of JavaScript will create the version row in the browser localStorage of the visitor.
Action:
function() {
  var keyValue = localStorage.getItem('version');
  return keyValue;
}
It’s important to be aware that browsers do not reset the localStorage automatically, unlike Cookies. Visitors have the option to manually reset it by clearing their browser’s cache and other stored data, but the likelihood of them doing so is relatively low.
Consequently, running experiments in this manner can surpass the duration of cookies that are automatically reset, thereby enhancing the accuracy of your data.
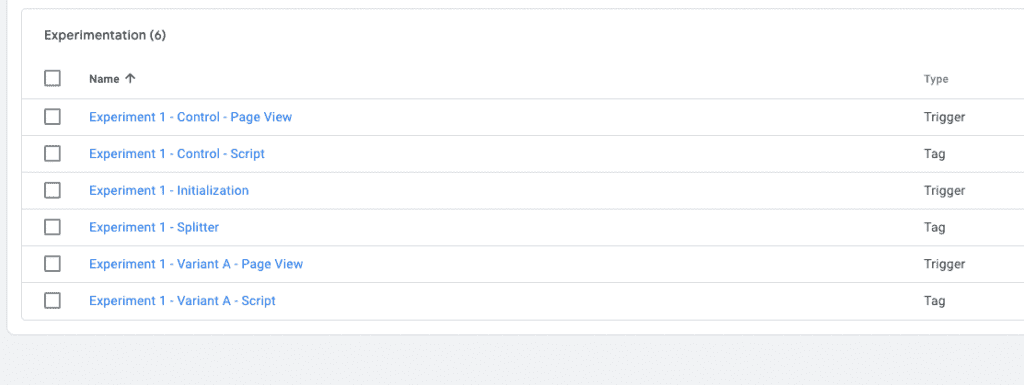
Next, we will proceed with configuring all the triggers. To execute a single experiment, you will require three triggers.
This trigger is used to see if there is a experiment running on the page that the user visits.
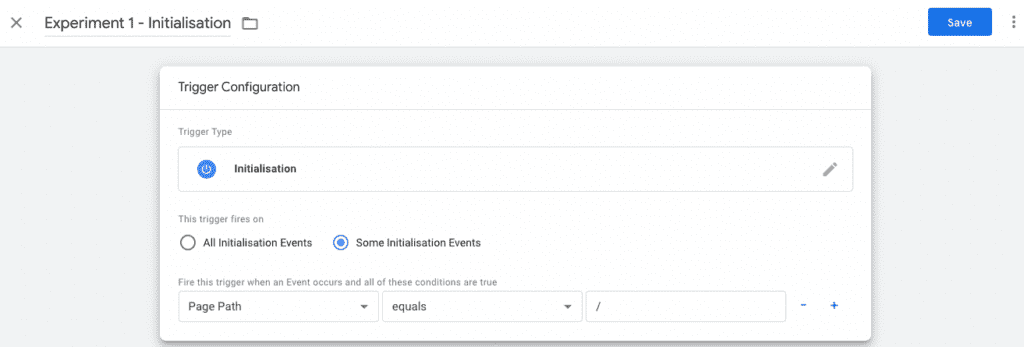
This is also the place where we can add more requirements, for example device targeting.
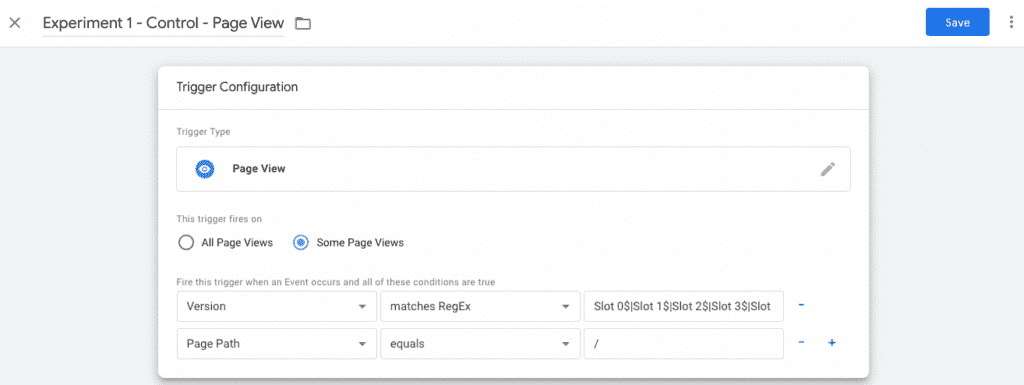
Now, let’s delve into the experiment trigger (for the control).
That’s it for the control variant.
Now, let’s delve into the experiment trigger (for the variant).
That’s it for the variant. All the triggers are done now. Let’s move on to the tags.
All the triggers are done now. Let’s move on to the tags.
It’s time to add three new tags and make adjustments to the GA4 configuration to ensure that the data is sent to the custom definition we previously created in GA4.
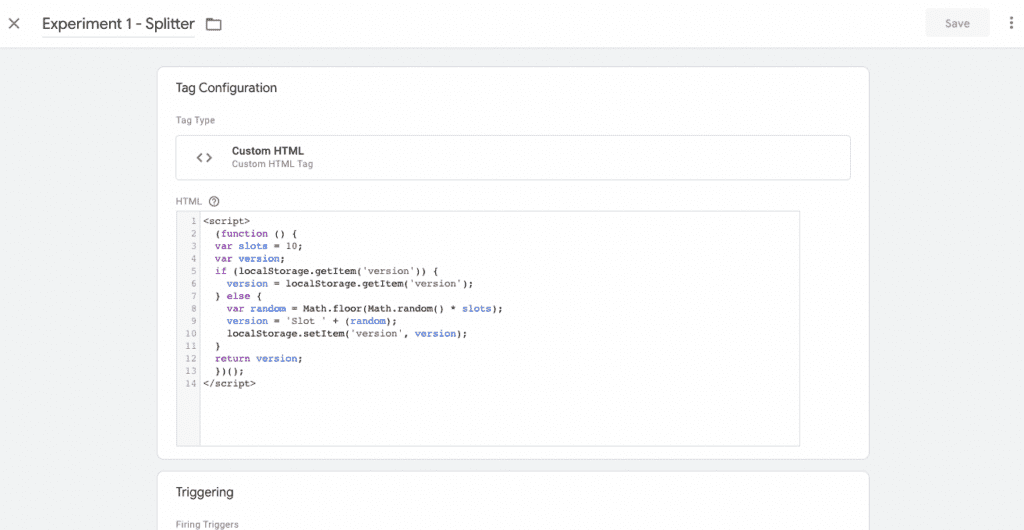
After the Initialisation trigger has been activated, we will employ a tag that randomly divides the traffic into either the control or variant. This split tag will be triggered accordingly.
<script>
  (function () {
  var slots = 10;
  var version;
  if (localStorage.getItem('version')) {
    version = localStorage.getItem('version');
  } else {
    var random = Math.floor(Math.random() * slots);
    version = 'Slot ' + (random);
    localStorage.setItem('version', version);
  }
  return version;
  })();
</script>
That’s it for the splitter tag.
Once the splitter tag has successfully executed and the user falls within one of the slots ranging from 0 to 4, the control tag will be triggered.
<script>
  (function () {
    // experiment code here
    console.log("Control loaded");
  })();
</script>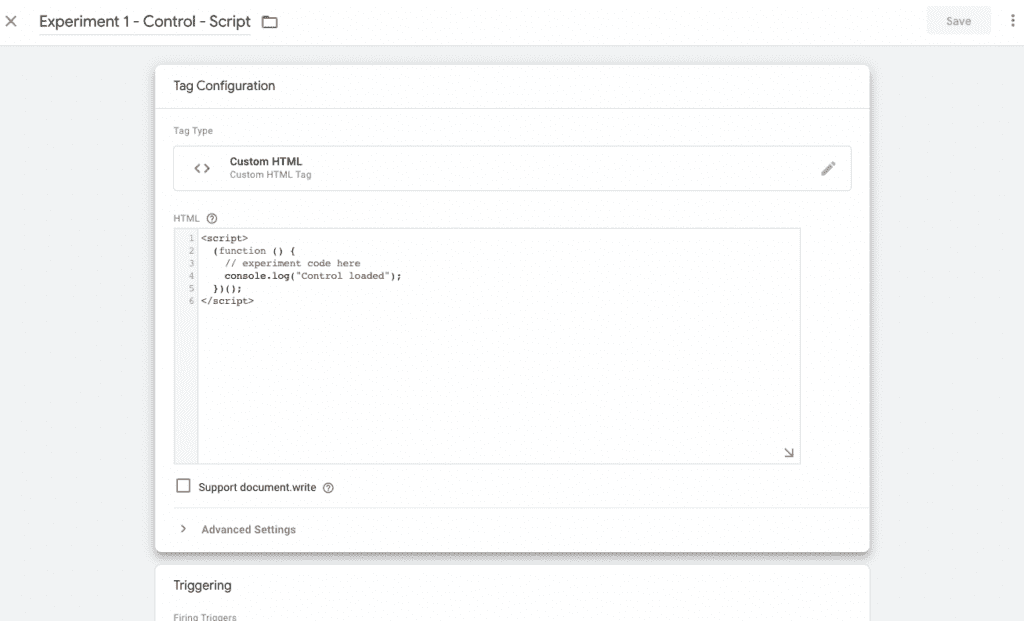
Once the splitter tag has successfully executed and the user falls within one of the slots ranging from 5 to 9, the variant tag will be triggered.
<script>
  (function () {
    // experiment code here
    console.log("Variant loaded");
  })();
</script>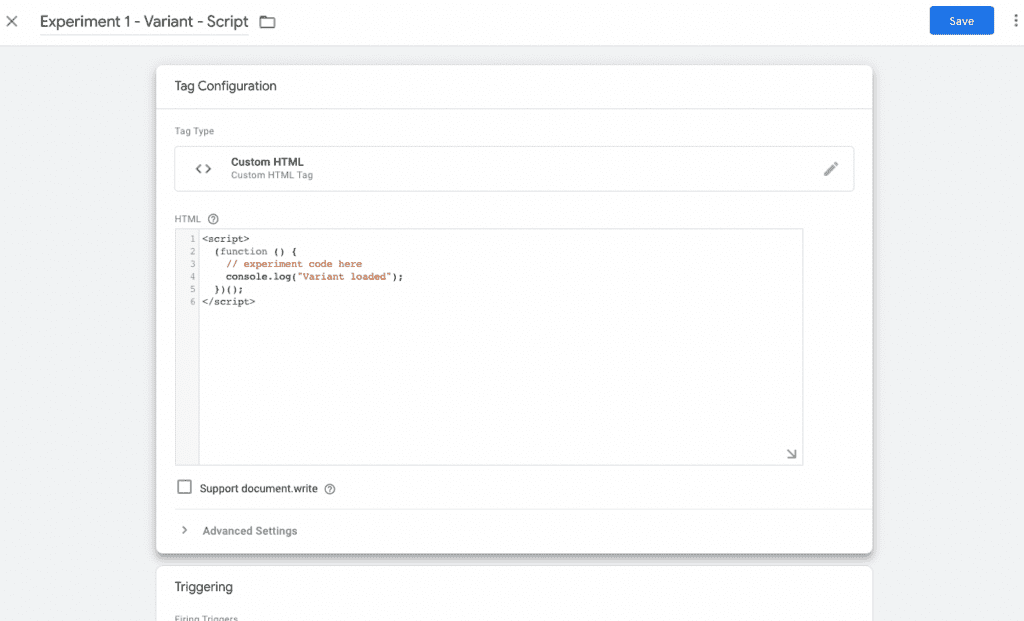
Lastly, we need to make edits to the Google Analytics tag.
Everything in GTM has been set up! Basically we could now start to run an A/A experiment to see if the data collection works. But, before we do so we need to check if all data works correctly.
The first step is simple. Preview your new changes on the website.
Time to review if everything works as it is suppose to.
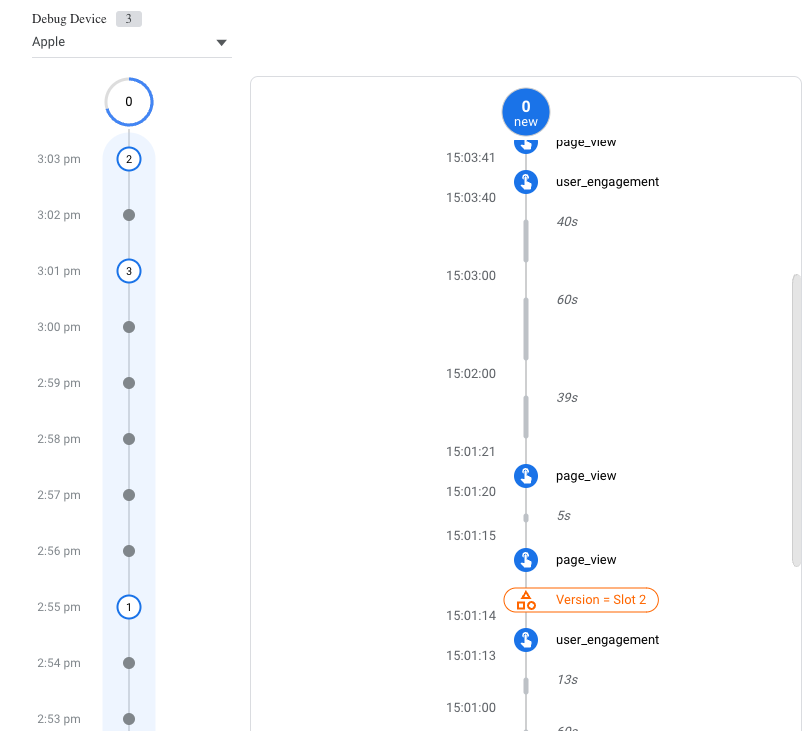
Check 1: Second step of the preview mode should fire the Experiment 1 – Splitter tag.
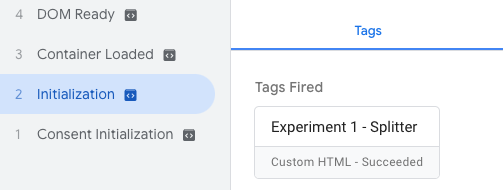
Check 2: Move to the Variables tab (still in step 2) and check if a Slot has been set with the Version (bottom row).

Check 3: Navigate to step 3 in the left sidebar and verify whether Experiment 1 has been triggered. Depending on your version, the Control should be fired if your slot falls between 0 and 4, while the variant should be fired if the slot value ranges from 5 to 9.

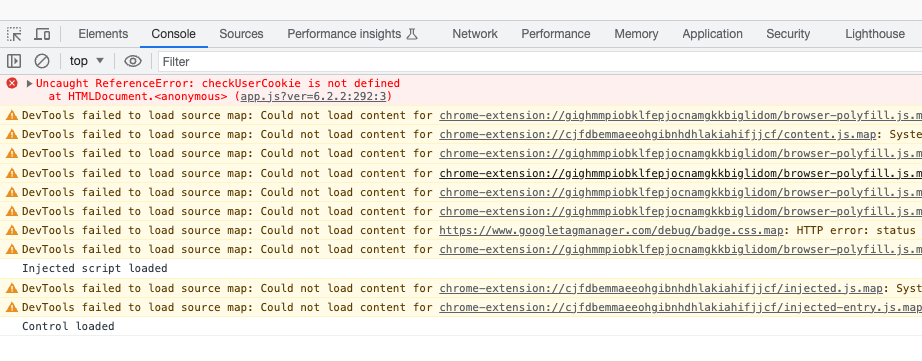
Everything seems to work with me. Now let’s also check the console log to check if the Control Script has fired.
Check 4: Open the website (still preview mode of GTM), right-click and select Inspect. Now open the console tab and check if there’s anywhere ‘Control loaded’ or ‘Variant loaded’ in the content.
Leave the GTM preview mode open before heading to the next step. We’ll still need it. I mean this tab:

The first thing you’ll have to do is to add Google Analytics Debugger to your browser. By doing this, you will be able to utilize the Debugger view in Google Analytics 4. This functionality applies to every website present in your Google Analytics account, making it incredibly useful in various scenarios.
Remember, as mentioned earlier. It can take up to 48 hours before data is shown in GA4. However, the DebugView is live, so there might be little delay (couple of seconds).
You’ve checked everything for the debugging!
Everything is set to go, still two things left to do.
This way everybody knows what these items are being used for. Time to publish these changes!
It’s running! Always start with an A/A test, which means no changes to the website, to make sure you collect the data you need.
To make running experiment more interesting I have some additional information.
Something you would like to run experiments only for specific devices right. You won’t have to do anything if your experiment is focused on all devices. However, if you would like to run an experiment only for mobile users than we have to configure some additional settings.
function(){
  var width = window.innerWidth,
    screenType;
    if (width <= 520){
      screenType = "mobile";
    } else if (width <= 992) {
      screenType = "tablet";
    } else {
      screenType = "desktop";
    }
  return screenType
}
Now let’s move on to the triggers. You have to do this for all triggers ‘Initialisation, Experiment 1 – Control, Experiment 1 – Variant’. I’ll showcase just one, the rest is the same. Repeat the following steps for all triggers related to the experiment.
Make sure to test it in preview mode within GTM before publishing.
Split testing can be done using Google Tag Manager. This comes in handy for paid ads for example. The setup works the same as explained in this article. However, this is the defined JavaScript code you can use.
<script>
(function() {
    'use strict';

    // Get the current URL parameters
    var queryParams = new URLSearchParams(window.location.search);

    // Create the new URL with the current parameters
    var newUrl = 'https://sandervolbeda.com/';

    // Append the parameters if they exist
    if (queryParams.toString()) {
        newUrl += '?' + queryParams.toString();
    }

    // Redirect to the new URL
    window.location.href = newUrl;
})();
</script>
The code above also includes the parameters if the exist. Copy and paste the code in the Experiment 1 – Variant – Script, to make it work. Don’t forget to change the link from my website to the URL it should redirect to!
So far, I’ve been really enjoying this way of doing experiments. It does everything I needed and did with Google Optimize in the past. It’s even a bit more flexible if you ask me.
Pros:
Cons:
This article couldn’t have been written without the help of others! Big shoutout to Mike and Jeroen.
Mike Talyor – Thanks for the setup used in this article
Jeroen Wiersema – Free course on this matter
Working remotely from Groningen, the Netherlands. Get in touch and let’s schedule a meeting, no strings attached.
Get in touch
