First things first, why would you use scroll depth tracking? Tracking scroll depth will give you an indication of how visitors/users are going through your content.
You might already know Bounce Rate, for example, this is how many people leave your website without taking any further action. This, in general, doesn’t say anything because you still don’t know what these users did except for not taking any further actions on your website. Scrolling and digesting content isn’t included in the Bounce Rate metric.
In short, you can use Scroll Depth Tracking to find out where your visitors/users leave the page. You can then consider changing the order of the content, placing more call-to-actions, or optimizing the content. After changing these things you can compare the Scroll Depth/Bounce Rate before the changes you’ve made and afterward, this is how you find out if your changes have worked.
Go to the Google Tag Manager website, create an account and just follow the steps to implement Google Tag Manager on your website.
If you aren’t a coder, new to this all, and you have a WordPress website, then you can use a plugin called Insert Headers and Footers. After installing, go to Settings > Insert headers and footers and continue to follow the steps given on the Google Tag Manager website.
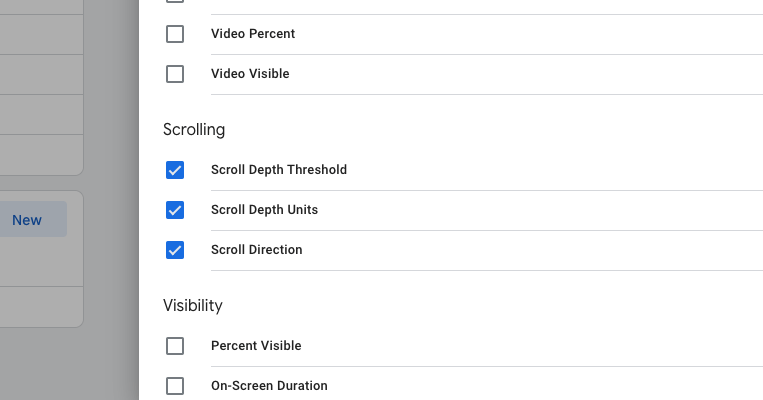
Go to Variables on the left side menu, click on configure and activate Scroll depth variables named Scroll Depth Threshold, Scroll Depth Unites, and Scroll Direction.
It’s time to create the tag, but before that, it’s smart to add your Google Analytics through Google Tag Manager if you haven’t already. Make sure if you do it this way that you remove the Google Analytics code from your website otherwise you’ll load it twice and this will corrupt your data.
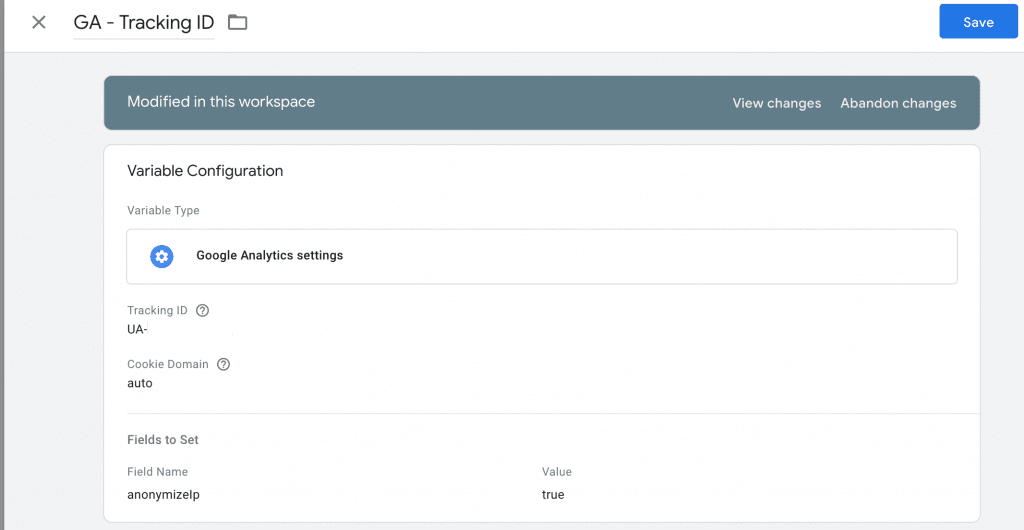
Go to Variables > New and give the tag the name GA – Tracking ID or something like that.
Variable Type: Google Analytics Settings
Cookie Domain: auto
More settings > Fields to Set > Add field with the following details:
Field Name: anonymizeIp
Value: true
These last settings are needed for the GDPR law. You’re now ready to save the variable.
It will look like this:
Now we’ve got to add the tag which will fire when a visitor/user loads the website. Go to Tags > New and Name the tag GA – Tracking Code. Click the Tag Configuration and choose Google Analytics: Universal Tracking.
Track type: Pageview
Google Analytics settings: Now choose the variable you’ve made earlier in this step
Next, click on Triggering and Choose the trigger called All Pages. This means this code will fire on all the pages, this is needed for Google Analytics to properly work.
Save it and you’re done with this step!

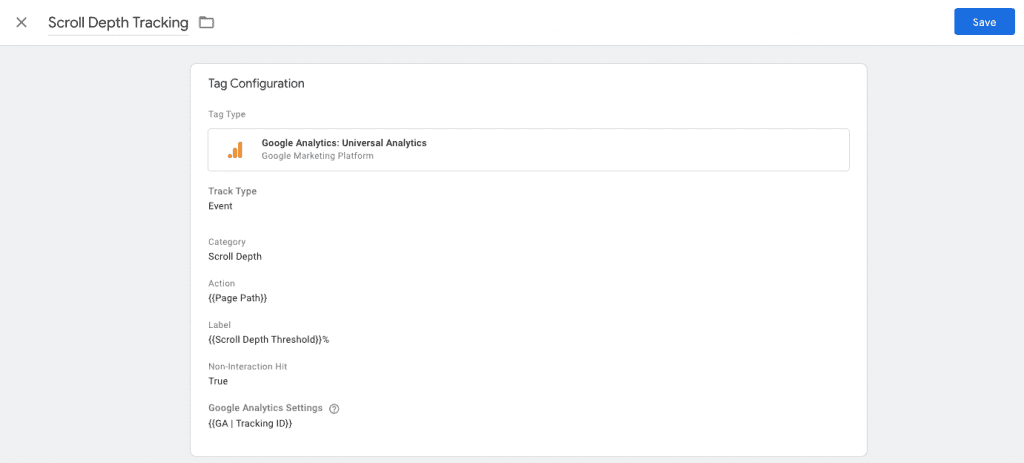
Tags > New and name the tag Scroll Depth Tracking.
Tag Type: Google Analytics: Universal Analytics
Track Type: Event
Category: Scroll Depth
Action: {{Page Path}} (To identify the scroll depth on different pages)
Label: {{Scroll Depth Threshold}}%
Click on the trigger and let’s create a new one.
When making the tag, you can also add a trigger. Since we’ve got to create a new trigger, click the + icon. Name the trigger the same as tag Scroll Depth Tracking.
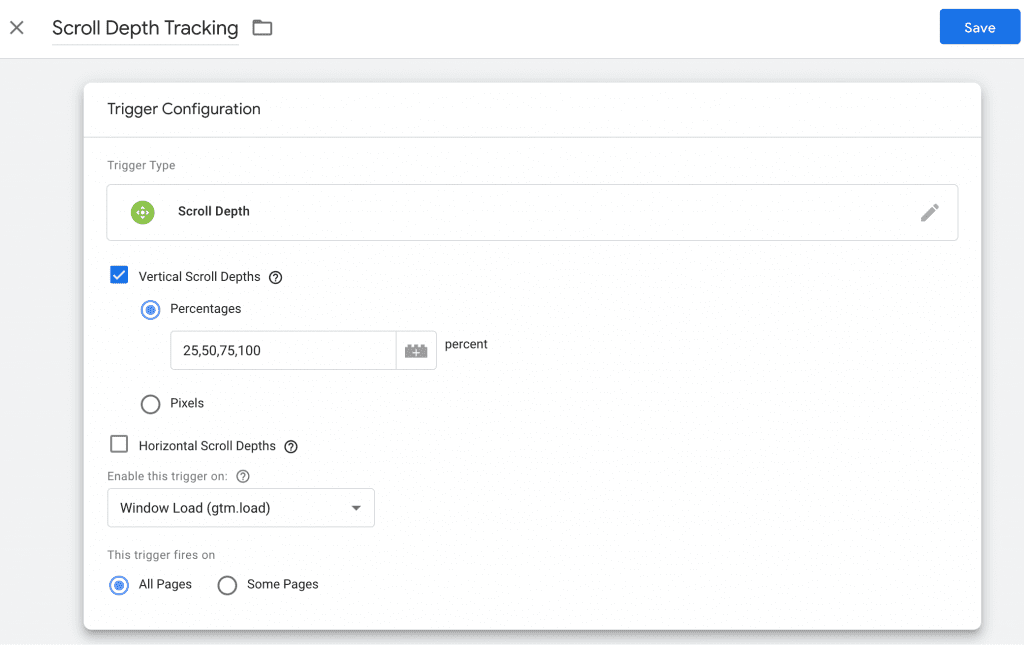
Type of trigger: Scroll depth
Depth for vertical scrolling: Percentages: 25, 50, 75, 100
You could also use 10, 20, 30, 40, 50, etc., etc. but most of the time 25, 50, 75, 100 is enough. This trigger should fire on all pages.
Hit save and save the tag.
We’re done with setting up everything we need to track the scroll depth. Now let’s submit the changes for now and check in analytics if everything is working (normally you would preview this in Google Tag Manager etc. but that’s too technical for now, so we’ll just publish it).
Open Google Analytics > Realtime (left menu) > Events and now click the small text Events (in the last 30 min). Go to your website in a new tab, scroll to the end of the page and move to the Google Analytics tab again.
There should be data in Google Analytics now. It’s working! Click around and check the data. How it works is if somebody scrolled 25% of the page it counts as 1, if another person scrolls to 50% of the page this counts both as 25% and 50%!
If you would like to see all the data, not real-time, move to Behaviour > Events that’s where you can find all the events fired. It might take some hours/days before data is shown there, since Google first needs to process the data.
You now have access to new data, important data which you can use to optimize your website. If you have any questions related to this article, feel free to hit me up on my social channels. Since you’re interested in this topic, there are more articles on this website that might be interesting to you. The first one is Outbound Link tracking and the second one is Timestamp tracking to see at what times your users are doing certain actions on your website (including timezone!)
Working remotely from Groningen, the Netherlands. Get in touch and let’s schedule a meeting, no strings attached.
Get in touch
