Have you ever wanted to run an experiment based on a specific class in HTML? In this article, I’ll explain the situation when you can use this and how you can use this method. We’ll be using Google Tag Manager and Google Optimize. This would also work with any other experimentation.
Recently I’ve been in the position to run an experiment across a couple of 100 product pages. The website didn’t have categories in the URL, it was literally: thiswebsite.com/product-name.
There was no way I could easily target these pages using a Regex. The data layer was also corrupted, which had me in a difficult situation.
I came up with the idea to run experiments based on classes that were added to the body in the HTML. This was already possible, but I didn’t know how.
Before we dive into the Google Tag Manager part, we have to dive into the experiment we would like to run. You’ll need to set this up before you can set the custom trigger in Google Tag Manager.
1. Login to Google Optimize
2. Select the domain you want to run the experiment on
3. Create or edit the experiment of your choosing
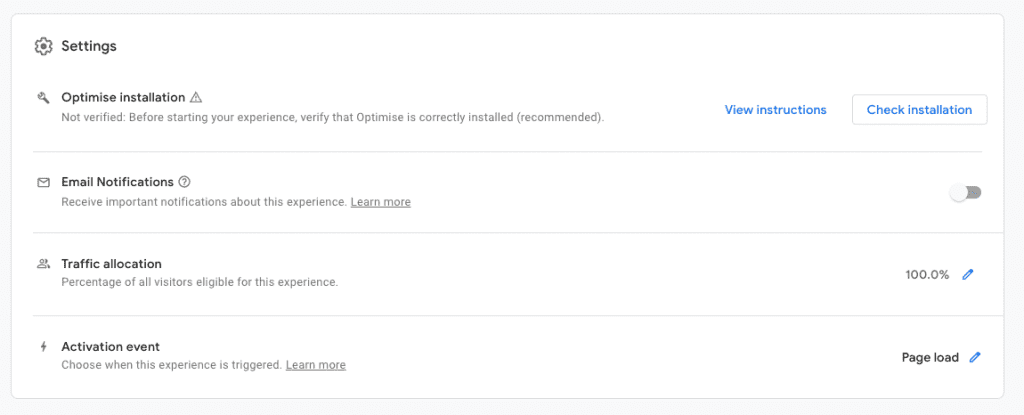
4. Scroll down on the detail page of the experiment to Settings > Activation event
5. Edit and change the Activation event to On custom event
6. This is the important part. If you only run one experiment on the domain at the same time. You can use the Event name: optimize.activate
If you’re running multiple experiment at the same time it’s better to change the event name. Change the Event name to optimize.activate to something like:
optimize.activate-idhereReplace the idhere part with a custom identifier. Make sure to document this somewhere. For example: optimize.activate-experiment1
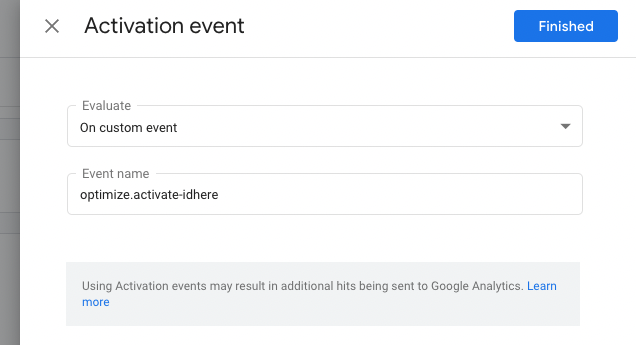
Hit the ‘Finished’ button, the top right corner. Let’s continue and move into Google Tag Manager (GTM).
Did you know, that WordPress automatically adds classes to the body tag in HTML? This means, even if the URL structure is missing categories etc. you can still run the experiment on multiple pages using their specific class name.
* Note: It’s not only for body classes, it could be used for any class or element.
In order to set this up, we need to have Google Tag Manager installed on the website.
Let’s set this up.
1. Login to Google Tag Manager
2. Create new tag
3. Name the tag: Experiment – Temporary Trigger
4. Now choose the tag Custom HTML
5. Add the code:
<script>
(function () {
    "use strict";
    function observeAndRun(selector, callback) {
        new MutationObserver( function () {
            if (document.querySelector(selector)) {
                callback();
                this.disconnect();
            }
        }).observe(document, { childList: true, subtree: true});
    }
    observeAndRun(".your-class-name-here", function() {
        dataLayer.push({ event: "optimize.active" });
    });
})();
</script>
Make sure you also copy and paste the script tags.
The function observeAndRun checks if the class name/element you selected is loaded. When that’s the case it fires the event to Google Optimize telling it to run the experiment.
7. Adjust the code that you’ve copied/pasted into Google Tag Manager (GTM)
Do you already have the class in mind on which the experiment should be fired? For example, if I would like to run the experiment on every blog post I have on this website, I should look to classes that represent this type of page.
For my WordPress website, that’s single-post. You now need to adjust the code you’ve copied and pasted into Google Tag Manager. The part you have to change is line 12, like I did down below.
observeAndRun(".single-post", function() {
    dataLayer.push({ event: "optimize.active" });
});
Now in case you want to do it based on ID you should replace the dot . with a hashtag #, if you would like to target an element such as H1 hoe can just write down h1 instead of .single-post.
8. Optimize your code to make it faster
To make everything go faster, you can compress your code. Go to JSCompress.com and drop your code in there. Click compress JavaScript and if you don’t get any errors you can copy and paste the compressed code into GTM.
The advantage of compressing the code is that it makes the loading faster. These milliseconds might have an impact, you never know, so it’s always recommended to do this.
9. Save the tag
10. Go to Google Optimize and publish the experiment (the experiment will only be ‘live’ when the Google Tag Manager tag is published)
11. Go back to GTM. Preview the changes
12. Check if it works in the preview mode
13. Submit and publish the new GTM version
You’re now able to publish experiments based on checking if classes, ID’s or elements exist on the page. This can be useful in cases the HTML has classes implemented for specific page types or elements on your website.
Think of elements only showing to returning visitors, or visitors that haven’t been active for 30 days, for example. You can now easily target these elements for experiments.
CRO specialist based in Groningen. I help companies increase revenue by optimizing their conversion funnel.
Schedule call